what does the button scan image do in either weed detection or calibration window?
how can I delete a calibration? If I redo it do the new calib parameters are stored if the calibration suceeds?
once a calib is successful, is the overlaying coordination system always shown or only during weed detection test?
which information does the coordinate system alignment take into account? also the origin setting in the farm designer setup? The bot should have enough information with on which axis the two markups are placed and the origin origination
in the picture, right?
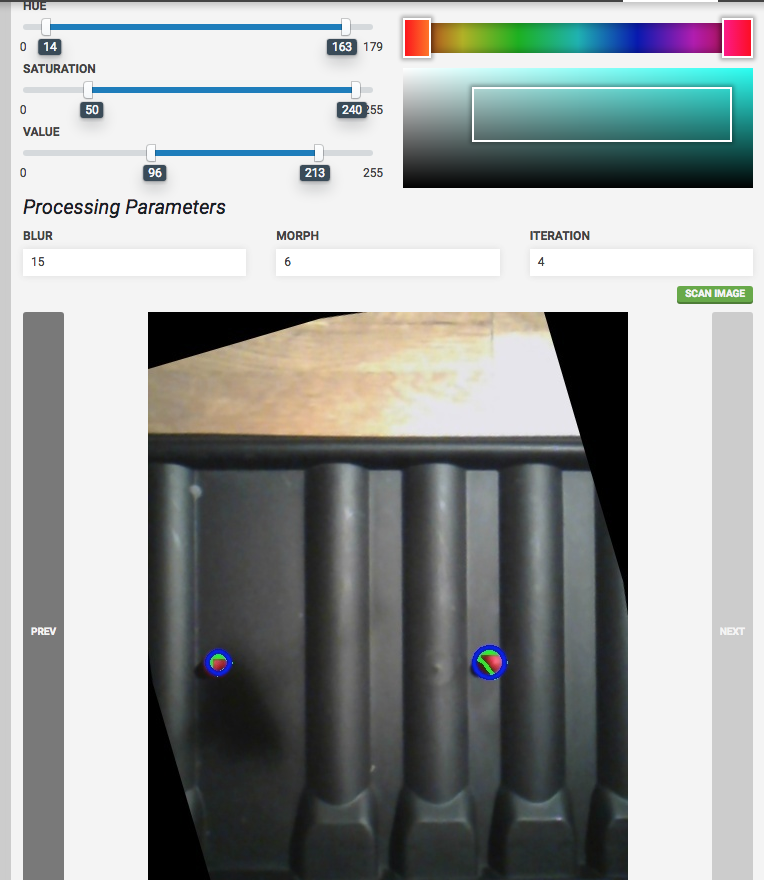
how can I verify wether the settings as hue, saturation, value etc. are correct? why is there no filtered image shown with
these values taken into account? I guess that would help…?
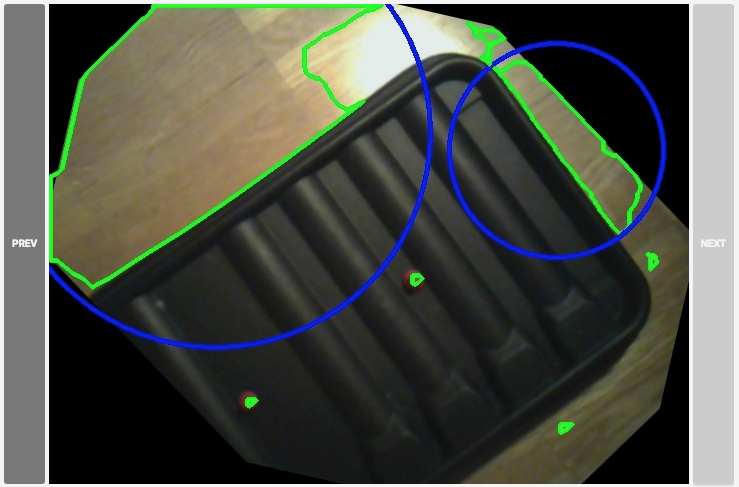
what does an image like this one tell me during calibration?
I’ve updated the camera calibration documentation with more information, hopefully answering many of your questions. Let me know if you still need clarification.
For your image, you will want to adjust the hue to select more red and less brown until only the two red dots are selected (green outline and blue circle).
Also, the origin selection in the Farm Designer is only for rotating the map based on your viewing direction. It is for display convenience only, and does not affect device operation.
Wouldn’t it be great if the picture would already take the hue, saturation and magic “value” settings into account and show the filtered image? Thus one could clearly see why it detects some areas faulty…?
But it then takes this rotation into account and cuts the image. Does it dewarp the image as well?
What is the convention, how does it rotate an align the image?
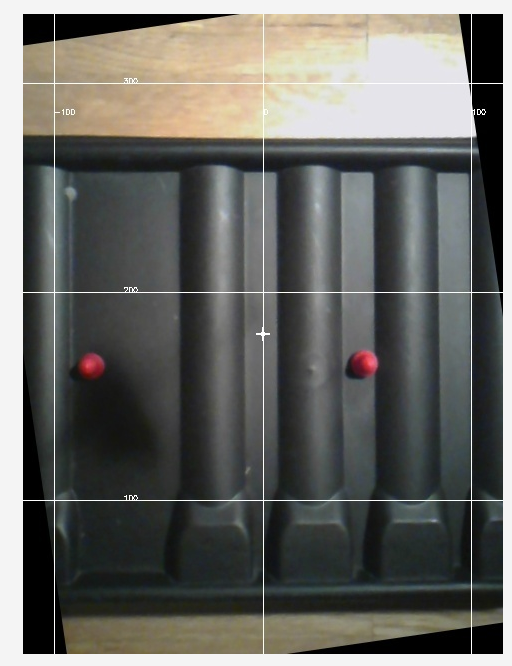
Today I tried a little bit more and this confuses me. It triggered correctly the two red dots, as I understand from your explanations and this picture here:
But they are wrong. How are they calculated what does that take into account? I guess if they are not matching between coordinate where the FB is vs. weed detected the system is not able to decide wether its a weed or a seedling, right?
Please give some more text in the wiki as well…
Thanks very lot for the fast responses, @Gabriel! That is needed and appreciated!
The green outline shows all of the detected regions in the image based on the hue, saturation, and value inputs. The 18 objects may be too small to see. It looks like it worked properly, so I wouldn’t worry about them. Rotation is based off of the calibration object separation along axis and origin location in image inputs.
The coordinates are calculated based off of the calibration object separation and camera offset inputs. You can change the separation input to adjust the scale, and the offset input to translate the coordinate overlay.
More information about how weed detection works is available on the Weed Detection page of the documentation.
So for me it sounds like what I understood from the wiki: calibration object separation is the distance between the two detected red marks and calculatest mm to pixels ratio
camera offset shifts the 0,0 coordinate from the point that I select to be my (0,0) point with origin location in image to the approriate point in the picture; so I could determine my (0,0) coordinate from the garden by moving the bot to that position and comparing it visually?
But how does the bot know into which direction the positive directions are? Is it always away from the point origin location in image in positive direction? By using calibration object separation along axis the software knows wether the direction between the two marks is x or y, right?
Please explain a little bit more as I did not understand it fully yet…
Thanks very much, missed that before. That topic is still disconnected from the usage in sequences, is that intended to be?
Regarding camera calibration, yes, it sounds like you’ve got it.
For destroying weeds in sequences, you will want to create a Destroy weed sequence (using Move Relative commands) to run in an Execute Sequence step after moving to the weed location using a Move Absolute step. Currently, you can select each weed you want to destroy in a new Move Absolute step. We’re working on a feature to make the process more efficient in the future.
I am not sure if the following warrants starting a new topic or just adding to this one - I will let the FarmBot Forum Moderators make that call…
Having said that…
I would like to see more detail in the camera calibration documentation about actually dialing in the camera to do a full-plot stitched picture.
While the default and “auto-calibrated” values kind of get you in the ball park, to actually have two pictures stitched together as tightly as possible seems to be a bit of a daunting and tedious task.
It would be good to have some guidance on how to actually go about adjusting the offsets and the pixel coordinate scaling to get two images stitched.
I find that I am kind of “shooting in the dark” trying to find a good, methodical way to adjust images to align.
Maybe someone can put together a “How to dial in your camera to take a full plot image” document…?
I will try this weekend (Saturday) to put together a guide for dialing in a FarmBot camera to a spec that produces a complete stitched plot image.
Any pointers, tips, tricks or guidance would be most welcome! (@Gabriel & @Marc , and please fwd/include any FB folks you think can help offer ideas)
My rough flow is as follows:
I will adjust the camera physically to get the absolute best alignment - I would like to avoid using “Camera Rotation”, as I feel this introduces “black space” that will detract from the overall plot image.
a) Advice for orientation would be welcome. The image is 4x3 format, i believe. Would it make more sense to the the “4” on the X or the Y axis?
Run the stock FarmBot Web UI Camera Calibration
Adjust the Pixel Coordinate scale to get the image to actual size
a) I have not yet explored what happens to the scale of the image vs. the scale of the Farm Designer map when it is zoomed, rotated or seen on a mobile device.
b) I will use a fully-zoomed (large as possible) map of a FarmBot XL (1.4) as my baseline/test subject
Once the image is the correct size, I will use the X & Y Offsets to line the image up with adjacent images
Assuming all goes well, I will try to produce a fully-aligned plot image.
Nice to see that you put that much effort into that calibration thing. I always wasn’t sure if I’m the only one that struggles with that or if no one else even tries this feature at all.
Good call, thats really important. My camera was always slowly rotating over days, so i glued it into a solid position
Doesn’t seem important to me. If your pictures will overlap for a few millimeters, it doesn’t matter. If not, it might happen that you will need for example 7.5 pictures in Y-axis if you set the “4” on Y, but 10 pictures if you set it to “3”.
Adjusting the PIXEL COORDINATE SCALE value after calibrating might cause the WEED DETECTOR farmware to return an error ( [plant-detection] ERROR: Coordinate conversion calibration values invalid for provided image.) . Not really sure about that, but thats what I wrote down some time ago.
This will be completely fine, the images will stay in place and are still properly aligned. The images are zoomed aswell if you zoom in the farm designer via + and - buttons.
Having the tool bays visible in the farm designer can help you to set up your offsets. Just make sure that they fit as good as you can achieve. But be careful, the toolbays are on a different height than your calibrated bed, so they might be displayed in a different scale as the farmdesigner expects them.
One last thing: Check if your coordinates do really fit by moving to a small object (like a small leaf or weeds) on the ground using the MOVE MODE in the farm designer. Mount the weeder (or seeder) and move down until the tool is near the soil to be more accurate.
@Ascend - Thank You for the input, feedback and ideas - VERY helpful (and welcomed)!
I plan on using a long ruler (yard stick( s ) ) to verify scale, alignment and image-to-image position.
Lets see what i produce tomorrow…
@Gabriel - Can I adjust PIXEL COORDINATE SCALE without causing errors in WEED DETECTOR? If not, how can I dial in the scale if the CALIBRATE routine does not exactly match the scale of objects?
Adjustments to camera offset, origin, scale, and small adjustments to rotation can all be made after camera calibration for use by the next weed detection run. All of those except rotation will also change how images are displayed in the farm designer.