Hi
I am trying to achieve the following using Groups and Variables.
-Put an impression in the soil where every plant is to be in the future.
What I have done is:
1/ create a Group in FarmDesigner that has 2 rows of 20 radish plants 40 plants in total.
2/ Create a sequence that loads the seeder
3/ Create a Sequence that moves to the first plant location and then moves the Z axis and seeder down into the soil and then moves the Z axis back up by 50mm
4/ Create a sequence that puts the seeder away in the tool holder
All of these sequences work individually, but I can’t seem to get my head around applying these actions to the entire group of plants, I have tried various combinations of using the “Location Variable externally defined” position, selected the “Salad Crunch Radish” group and tried to test the sequence but no joy.
I select the “Test” button from the sequence and select the Salad Crunch Radish group from the drop down list, then press “Test” again
I get the log success message saying "Completed Mark radish group - Salad Crunch Radish (0 items)
Nothing else happens.
Thanks for that @jsimmonds , although I had created the radish group, I didn’t notice that there were no group members. I’m not sure why that is so, I thought that by creating the group, all of the plants that I had selected would automatically be in the group.
Anyway I manually added them to the group by individually clicking each plant (is there a quicker way?). When I tested the sequence again, it started to work (I was excited). Sadly my initial excitement was dampened by the fact that it completed the sequence on the first radish plant, moved to the second, then back to the first to complete the sequence. I’m trying to get it to perform the sequence on each plant, not to get my hopes up and then dash the same.
Before I posted to your topic, I tried the steps exactly as in Rory’s nice exposition and got precisely the outcome that you’re wanting : one water sequence per plant in the group
I’d “reset” everything and begin a-new
I think you can just use the square lasso on the garden designer image ( that square selection box that you get by holding BTN-1 down and dragging the “mouse” )
@dmbgo I took a look at your sequences and I think I see the problem (please let me know if this is not the case):
Create a group. Make sure that there are 40 radishes in the group. You should see the phrase “GROUP MEMBERS (40)” in the groups panel.
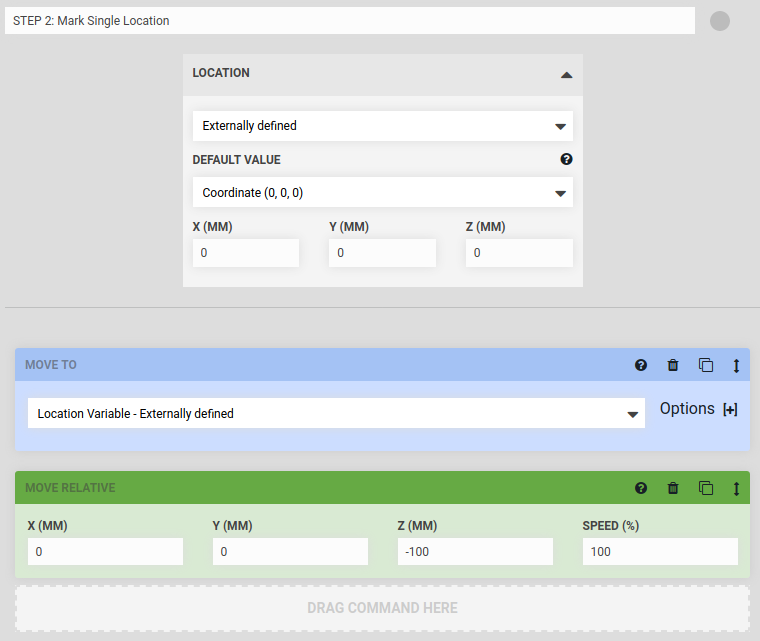
Create a generic sequence to mark a single position in the soil on a point which is externally defined. You can set the “default value” to (0,0,0) because it will not be used here. The “Externally Defined” part is the important piece of information - FBOS will replace this externally defined variable with a “real” one later (next step).
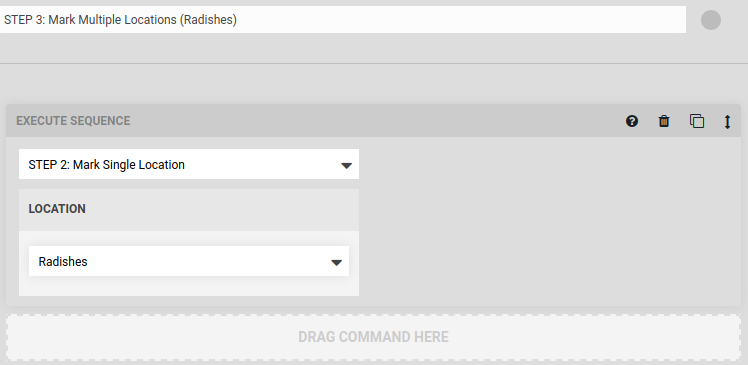
Create “wrapper” sequence that executes the sequence from step 2.
Add an “EXECUTE” block to the sequence from step 3.
The execute block from step 4 will require a parameter. Set the parameter to the “Radishes” group from step 1.
You are now ready to push the “TEST” button.
Here’s what it will look like when you are done. Please note that I have simplified the logic of “Mark Single Location” for illustrative purposes:
@dmbgo after taking a deeper look at your logs, it appears that the device stalled during execution but was otherwise executing sequences against group items fine. Please let us know if you need help with calibration. You may also contact us via the customer support channel.
Thanks @RickCarlino and @jsimmonds. You are right, and after looking at my sequences I see that I had specified the first radish as the starting point rather than an “externally defined variable”. I appreciate the offer of help to resolve the problem of the Y axis stalling (which is compounding things atm), but I think I will be able to sort out that one. Then I will try things again this time using an “externally defined variable” as the starting point.
I will update as information becomes available.
Hi @RickCarlino, it looks as if there is a separate issue now. I think I can fix this new issue by either recreating the group of radishes, or perhaps just by restarting the Farmbot, but here are the symptoms:
The Y axis is crashing due to it moving too close to the edge of the bed and jamming on the camera carrier.
My first attempt to fix this has been to delete the Y maximum radish plants and the Y minimum radish plants, which should have the effect of reducing the Y axis travel envelope by (in this case 45mm at each end of the travel). However when I run the sequence to mark the radishes, it still tries to move the Y axis to the old end position where the there used to be one of the plants. It appears as if it is not using the now updated group information for this sequence.
Well I’m a bit lost now. I think I’ve sorted out the Y axis problem with the group being too wide by rebooting, I then recreated the second sequence where you select the Radish group to apply the process to all radishes, but now the farmbot is going home to Zero on all axis every time it starts a new plant. I think I’ll give up for today and try again tomorrow. I’m a bit depressed atm, since I thought this would be sorted today.
After a bit of a rest @jsimmonds and @RickCarlino , I revisited the situation and realised that I had not specified a group of plants for the sequence contained within the “Master sequence” to run on.
I did this and voila, everything started to behave as expected.
I only have 1 question left about this routine now, to put the marks in the soil, the seeder travels down 50mm from 450mm to 500mm, then up 50mm back to 450mm. Then it makes an unnecessary movement from 450mm to 0mm, moves to the next plant and repeats. All this takes a long time because there is an unneeded movement of 900mm on the part of the Z axis. When specifying the group of plants initially you cant specify a Z location, only X and Y. Neither can you later edit them to specify the Z location. Is there any way to stop the Farmbot from moving the Z axis back to 0 after each plant and only have that movement at the end of the sequence?
Thanks again
Dave
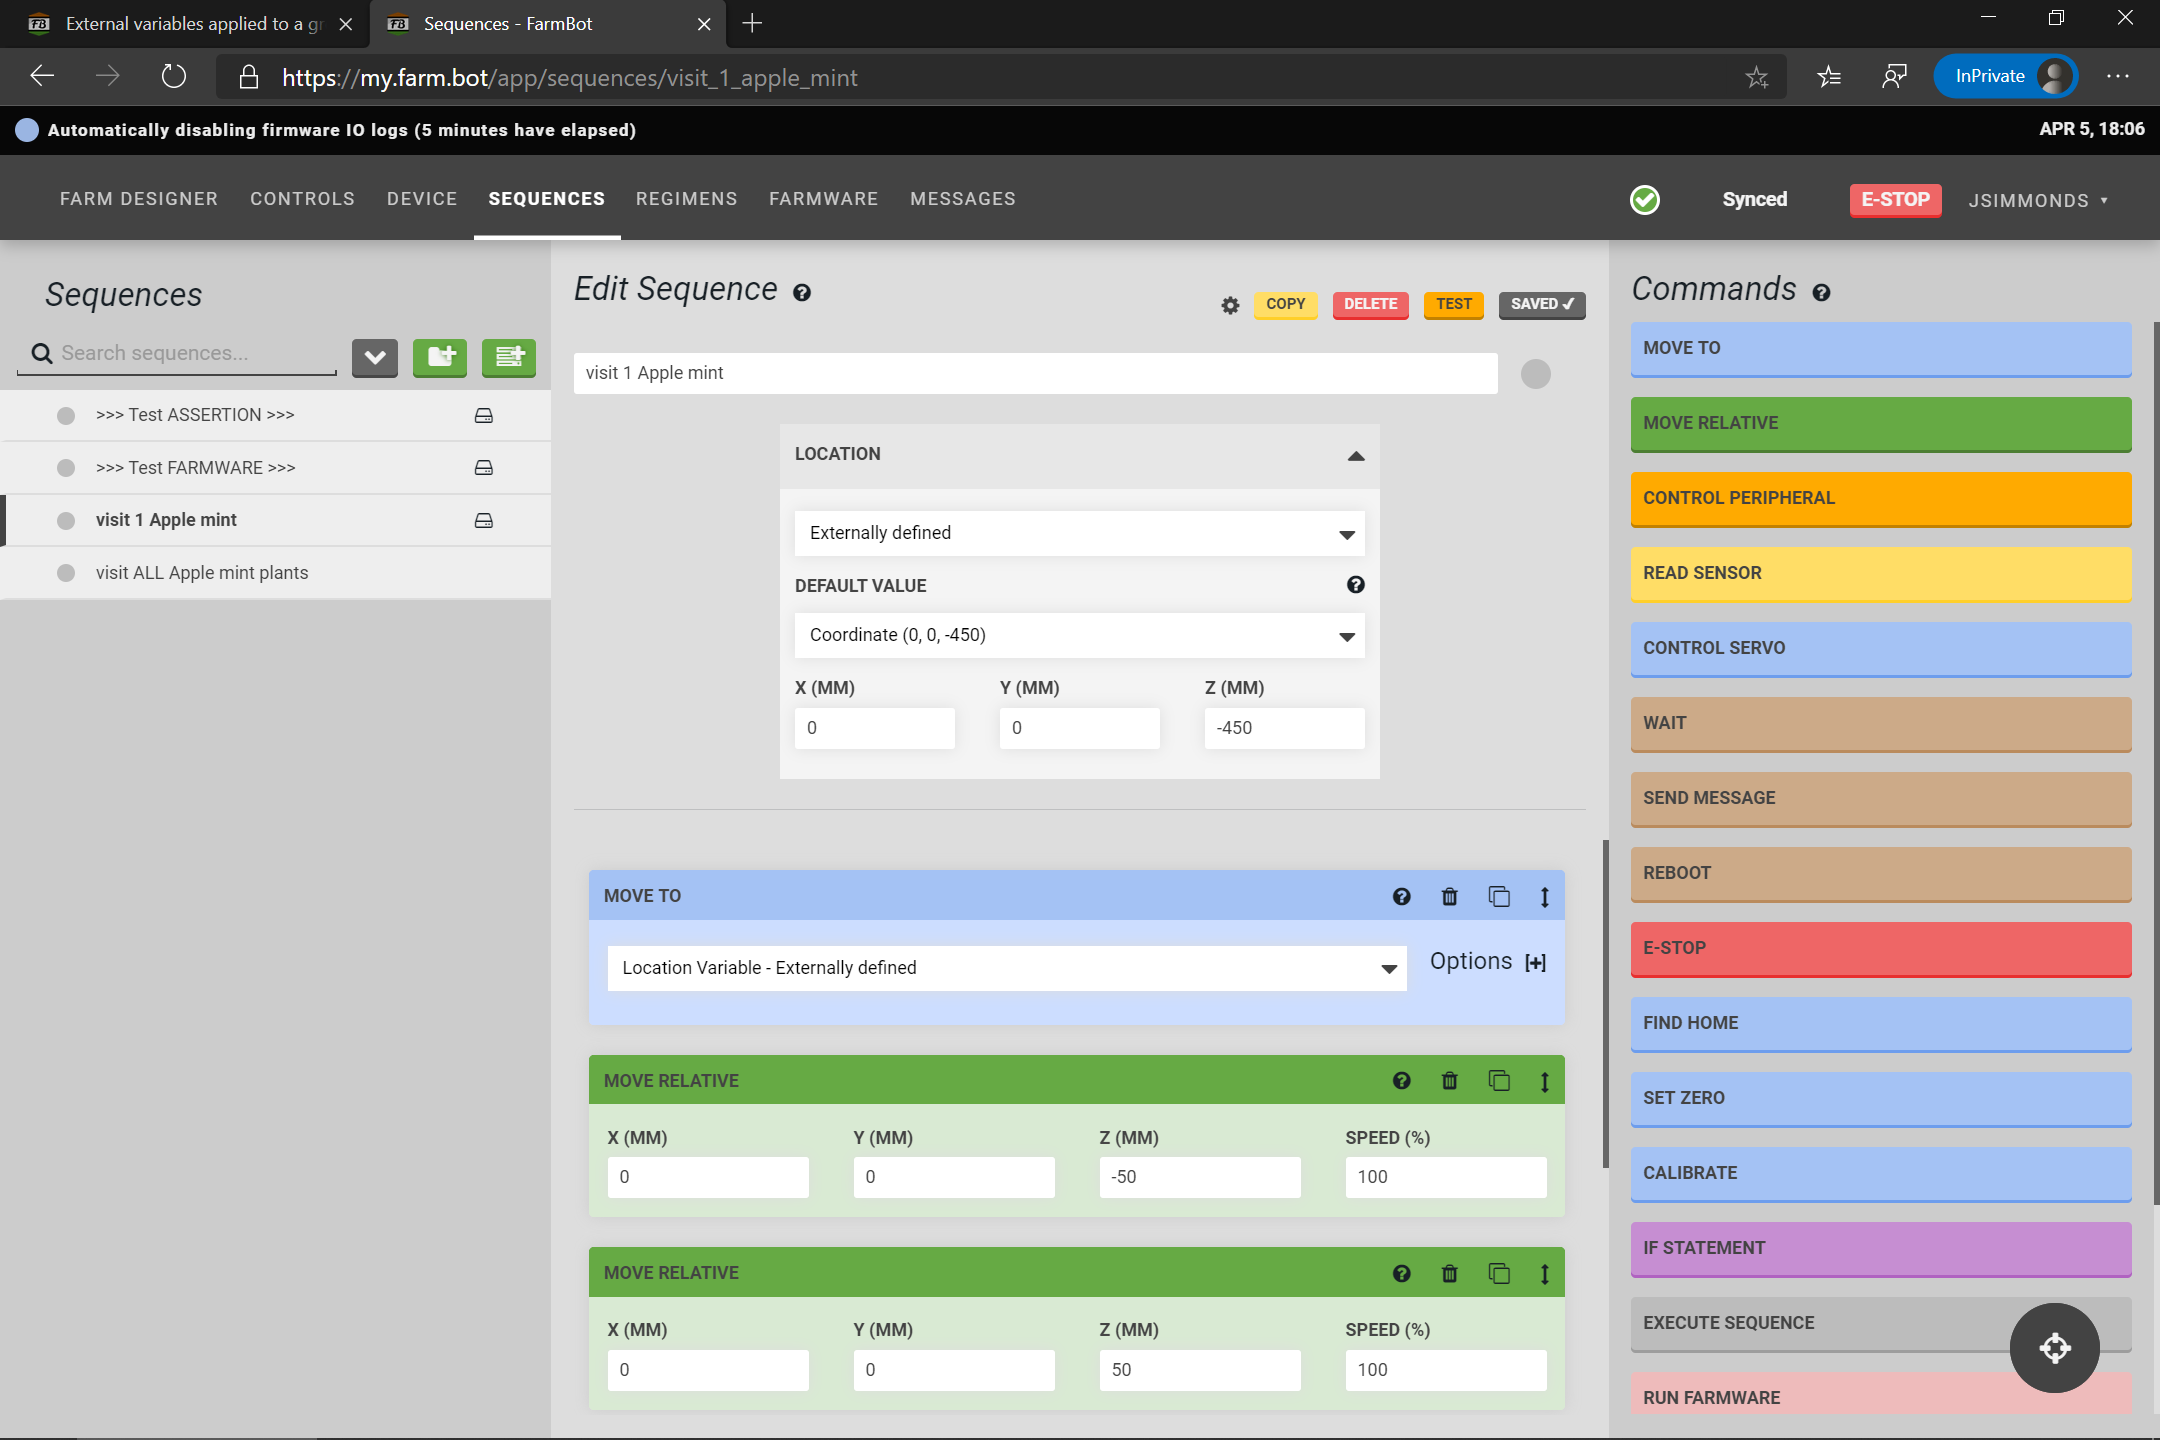
Provided your Z-axis 50mm excursions are Move Relative I think all you need is a default coordinate value for your Z-axis . . e.g. here is what I just played with . . in the “visit each plant” sequence LOCATION block note the -450 for Z and note the -50, (+)50 in the Move Relatives for Z
you need is a default coordinate value for your Z-axis
@jsimmonds The default position exists to handle edge cases when the user has not provided a value for the “externally defined” position. This can happen in certain rare cases, such as:
User creates a FarmEvent for “Sequence A”. “Sequence A” does not use externally defined variables.
A few days later, the user updates “Sequence A” to use an externally defined variable, but they don’t update the FarmEvent they created earlier
When FBOS runs, it now has a nil value for the “externally defined variable”. The sequence expects a variable and the FarmEvent is not providing it. This left us with two choices: crash (a mini “null pointer exception”) or force the user to always provide a fallback in places where a value could possibly become nil. We chose the latter, although this situation and the possibility for confusion is something for us to consider moving forward.
In this case, the user did provide a variable- it’s a group item. Because of this, the “default position” variables are not used (and appears to work as designed).
I will have a second post to address the other concerns mentioned above.
it makes an unnecessary movement from 450mm to 0mm, moves to the next plant and repeats. All this takes a long time because there is an unneeded movement of 900mm on the part of the Z axis.
@dmbgo I’m having trouble visualizing this one, and unfortunately I don’t have access to a FarmBot to try it out with due to COVID-19 precautions. If you could create a video and upload it to YouTube that would be great, but no worries if not.
A few things I noticed:
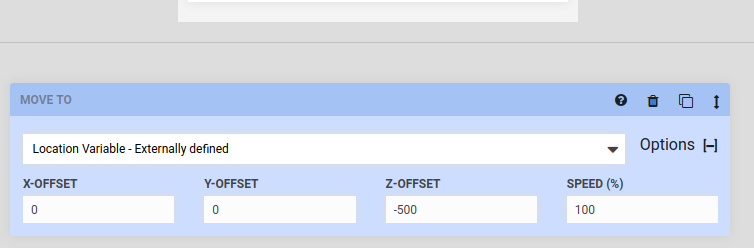
Have you tried setting the “Z-OFFSET” in step 0 to -500? Unless I am misunderstanding the problem, this should be an easy fix via the use of offsets. I apologize if I am misreading the question. Please let me know and I can continue helping with a fix. I’ve provided a screenshot of my suggestion below.
You might need to play with the z-offset value a bit. Although I am suggesting -500 you may need to be more conservative to avoid “dragging” through the soil. It’s hard to say without seeing your setup.
I looked at your sequence and noticed that after the first step you are using “MOVE TO” commands instead of “MOVE RELATIVE”. Using “MOVE RELATIVE” could make the sequence a bit easier to read and also edit later on. This is mostly a stylistic suggestion, as it is more inline with the intend use of “MOVE RELATIVE” but the way you have it right now may also work fine.
Below are some screenshots of a proposed solution to avoid needless movement to position z: 0
Thanks for the replies @jsimmonds and @RickCarlino,
To try to remove the unnecessary Z axis movement this morning I have tried the following:
(Bearing in mind that I have 2 separate sequences (one to perform the movement of the Z axis up and down then up again) and one to act as a wrapper that loads the tool then calls the first sequence to perform movement over the entire radish group, then unloads the tool).
Based on your suggestions,
I have:
1/ Set the first “Move to” command in the wrapper sequence to offset the Z axis by -300mm (this should be high enough to get over the end of the bed without dislodging the tool), but eliminate 600mm of the unneeded movement.
2/ Set the Z axis up and down sequence to offset the Z axis by -300
Neither of these solutions have changed the fact that once it gets to the second radish plant in the group, it moves the Z axis up to the 0 position, before proceeding with the sequence.
@RickCarlino I can upload a video to youtube if you like, but it would be a rather long, repetitive and boring video
STOP PRESS
I have just made it work! Believe it or not this time was my fault (just like all the other times).
Somehow I had tried adding a Z offset to my second sequence (the Z axis movement sequence) and thought that it didn’t work, when in fact it did exactly what I wanted.
All good now, sorry I lost my temper .
@RickCarlino, all you need is a 24V supply, a Farmduino and a RPi3
I tested your change and verified it by looking at the G-codes sent to the Farmduino.
(Firmware Output (Send) Logging ON)
This is actually how I am getting most of my work done during the crisis! It’s a good way for tinkerers to try ideas, also. I don’t like using this setup to debug movement issues though, as a piece of tape on an axis doesn’t demonstrate movement errors as well as the real thing.
Depending on how long we are locked down here in Chicago, I may go back to the office and move my (tiny) FarmBot to a new home.